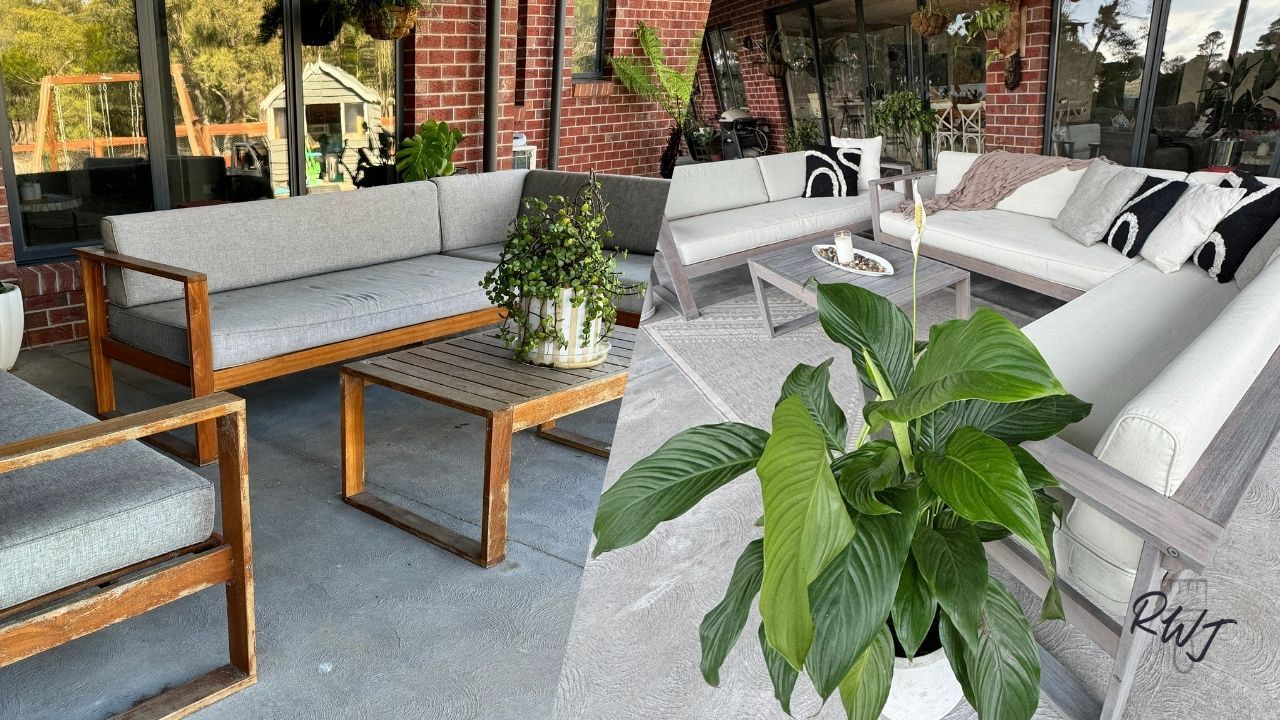
Revamping an Outdoor Setting - Including Painting The Fabric
This outdoor lounge setting was in serious need of a makeover. It was tired and damaged and crying out for some help. I decided to re-stain all of the timber and then paint the fabric. Yes, you heard that right—I painted fabric! Did you know you can actually do that? The end result is such a dramatic transformation. Below is the step by step guide to how I did it. You can do the same as what I did or you can add your own creative spin.
First, I gathered all the supplies I needed. Below is a list of all the supplies so you can find exactly what products I used.
- Grey Outdoor Finishing Oil - https://tinyurl.com/3y2br5kw
- British Paints Paint - https://tinyurl.com/4vu3v74n
- Fabric Softener - https://www.woolworths.com.au/shop/productdetails/255373/earth-choice-fabric-softener
- Tricleanium Degreaser - https://amzn.to/4d7YNj6
- Dark Cushion - https://tinyurl.com/mr2y2wpf
- Orbital Sander - https://amzn.to/4bTbLjF
- Paint Brushes - https://amzn.to/3WcIOcU
- Light Cushion - https://tinyurl.com/3w5yesnr
- Plant Pot - https://tinyurl.com/mur6swn6
I removed all the cushions from the couch and put them in the washing machine for a deep clean. Outdoor furniture is exposed to the elements and can get quite damaged if not regularly cleaned. It can also become a breeding ground for spiders, so my first job was to remove all the spider webs with a broom.

Once I removed the bulk of the spider webs, I dragged all the furniture out onto the lawn and gave it a thorough hose down. This was essential because the furniture was going to get wet anyway for a deep clean with a degreaser before painting. I used a crystal degreaser mixed with water, scrubbed down the furniture with a broom, and then used a household sponge to get into all the little bits.

While the timber was drying, I gave the concrete a hose and a scrub as well.

Once the timber was completely dry, it was time to sand it down. Make sure the timber is 100% dry before sanding, as wet timber will just gunk up your sandpaper. I started with an 80-grit sandpaper and went over all the timber. The old stain was lifting, so it was easy to sand it off. I didn’t need to sand it back to raw wood completely, just enough for the new oil-based varnish to stick and create a new colour.

Once everything was sanded, I gave it another quick clean and grabbed my stain. When using a stain and varnish product, make sure to give it a good stir before applying. I used a paintbrush for the application because of all the small joins in the timber. You could also use a roller or a spray gun, depending on the product.

For the first coat, I applied the stain and varnish everywhere, including all the spots that aren’t easily visible. The second coat was applied only to the visible areas to darken the colour and enhance the visual effect.

For the fabric paint, I used an equal ratio of paint to fabric softener. This mixture prevents the fabric from becoming hard and crunchy. I tried a few different ratios and decided that the 50/50 ratio was best. When I used less it was to light in paint colour and when I used more it felt a little too hard. I applied four coats of cream paint to cover the dark grey fabric completely. If you choose a darker colour, you might only need two coats.

I moved the cushions inside to paint them, as it was too cold outside for the paint to dry properly. I recommend doing lots of light coats and resisting the temptation to add more paint and less fabric softener.

After the second coat of varnish dried for 24 hours, I put the cushions back on and reassembled the couch setting. It looked fantastic, but it wasn't quite done yet. I added a new outdoor rug for personality, new cushions in dark colours for depth, and some beautiful greenery with potted plants on either side of the couches.

Here’s a look back at the before and after. The setting was completely refurbished for only $300 worth of products and supplies. I’ve been upcycling and doing DIY projects for years, and I’m still amazed at how some projects turn out.

Watch the step-by-step video process below. ⬇️
Do You Want To Hang Out With Us On A Regular Basis?
Don't miss out on your dose of DIY and furniture painting inspiration each week.
As a member of our family you will get hand delivered DIY, furniture flipping, crafting and home inspiration weekly along with tips to help you make more money as a furniture artist (if that is your cup of tea).
Sign up now. You know you want to. 😉


