
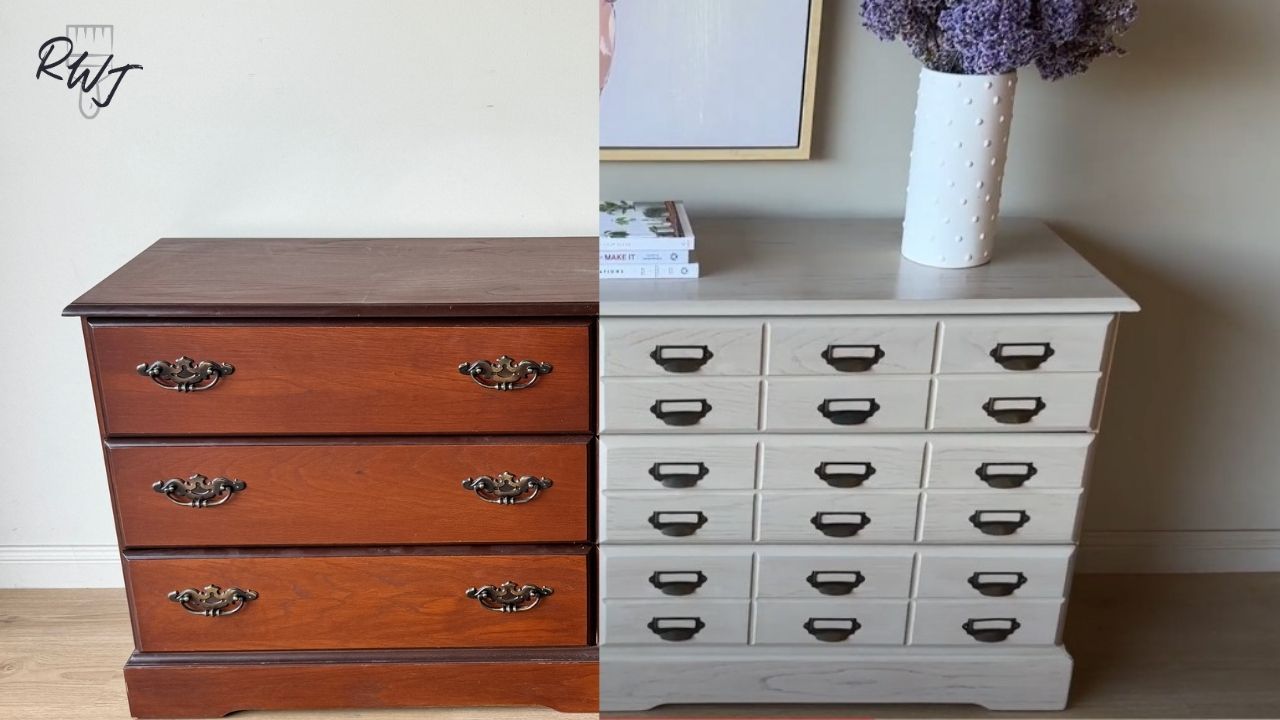
Creating a DIY Apothecary Cabinet
I've always loved apothecary cabinets; however, I haven't loved the price on them. I always find them so exorbitantly expensive.
So today, we are going to DIY our own apothecary cabinet. I'm going to be using the Ryobi router so that we can etch out the design on the drawer fronts. This is a little bit deceptive, making it look like there are a whole lot of little drawers, even though there will still be only the original six drawers.
Let's dive into the tutorial and let me show you how you can DIY your own apothecary cabinet. Below is a list of all the products I used in the makeover:
Paint Brushes - https://amzn.to/42bDpVP
Ryobi Orbital Sander - https://amzn.to/4c5GdaC
Ryobi Belt Sander - https://amzn.to/4c11GBm
Ryobi Router - https://amzn.to/4fBDusq
Router Bits - https://amzn.to/3WjGlNK
Krud Kutter Degreaser - https://amzn.to/3XM5l2r
Fusion Mineral Paint in Algonquin - https://www.dandelionwood.com.au/shop/Algonquin-Fusion-Mineral-Paint-p334958439
Apothecary Handles - https://amzn.to/3WufKOd
Water Based Polyurethane - https://amzn.to/3LNzFTm
Wagner Spray Gun - https://amzn.to/3SsU2Zq
The first thing that I needed to do was start to sand and strip all of the old varnish off this cabinet. I decided that I wanted to have the entire cabinet stripped back to raw timber and then I was going to add a paint wash to change the colour and feel of the timber.

There are quite a lot of different ways that you can strip timber and it really is a personal preference as to which one you choose. You can use a paint stripper and strip off the top layer of varnish and then use a sander to smooth it out afterward. Or, you can do what I did and use a sander to strip all of the varnish.
I started out with a belt sander. The belt sander is just a little bit more coarse and harsh, and it's going to rip through the old varnish a little bit quicker than an orbital sander will. I usually only use the belt sander to strip the top layer of varnish because it can be really harsh and you might end up with lines running along the timber where you've used the belt sander. This is going to be much more likely if you're not used to using a belt sander or if you've got too coarse of sandpaper on the belt sander.

Personally, for the sandpaper I use on my belt sander, I use an 80 grit and then I swap over to my orbital sander, using an 80 grit on the orbital sander followed by a 120 grit and then followed by a 240 grit to really smooth out that timber. This cabinet had a little etching and a little lip here on the edge, which I decided I was just going to sand flat. So, I used the orbital sander and pushed quite firmly to sand out that little lip and just create a nice smooth curve.

Once again, I chose to do this because this is the quickest way to sand this edge. If I wanted to keep that little lip there, I would need to use hand sandpaper to hand sand in that lip and then only use the orbital sander on the flat part of the edge and hand sand the rest so that I could keep that lip there. The orbital sander is way too harsh to use on that lip if you're wanting to keep that lip.

This particular dresser that I'm working on is actually made of a fair bit of chipboard with a veneer on the top surface. It's quite a cheap construction, and that's why I decided that when I was sanding those edges back to raw, I was going to need to use a paint wash on them to try and cover that a little bit because I didn't have a nice timber edge there.

It just makes it a little bit more difficult when you sand back and discover that you have chipboard underneath to determine what your top product you want to use on the cabinet and the timber. This is because a lot of standalone timber stain products don't absorb well into chipboard and certain types of timber. They can end up looking really quite patchy, and that's why for this particular piece I decided to use a paint wash because it absorbs a lot better into certain types of timber.

Once I finished sanding the top of the cabinet, it was then time to move on to sand the rest of the cabinet. This particular piece I chose to have all sanded and have that timber look coherently across the entire piece. But the best thing about refinishing furniture is that you can create whatever design you like. So if you really don't want to do a whole lot of sanding or stripping to get this back to raw timber, you could definitely have quite a lot of this cabinet or quite a lot of your piece painted, and that's going to require you to do a lot less sanding because all you're going to need to do is a scuff sand and then paint it.

I removed all of the old hardware and then put these aside because I might be able to use them on a future project, but they're definitely not going to be reused on this project. Because of the style of the finish that I'm going to be creating in that I am creating an apothecary cabinet, I have to use specific handles, which are the little apothecary handles, and I need to have a lot of them to create the effect of having multiple little drawers.

Once all of the handles were removed, it was time to do more sanding. I followed the same pattern on the drawer fronts, where I used my belt sander first to remove that really top layer of varnish and then swapped over to an 80 grit on the orbital sander. The 80 grit on the orbital sander enables me to remove any of those straight lines that may have been caused in the timber from the belt sander. Then, swapping to a 120 grit enables me to remove the rest of any of the varnish that's remaining. Finally, finishing off with the 240 grit enables it to really smooth out and make sure that there are no splinters or rough components, giving it a really smooth edge.

I think the most time-consuming part of this entire project was sanding the edges of all of these drawers. The drawers had the same little tiny lip that the top of the cabinet did, and I needed to sand all of the drawers. With six drawers and four edges each, these all needed to be sanded out to get back to that flat curve, and it did take me just under two hours to sand all of the fronts of the drawers and all of the sides of the drawers back to that raw exposed timber surface.

Once I had finally finished all of the sanding, I was so excited to move on, and the first thing I needed to do was fill in all of the old hardware holes. I did this with some wood filler and filled those holes up with wood filler. The holes weren't too big, so I didn't need to put timber in first before using the wood filler. But if you had really large hardware holes, I would recommend putting a little piece of timber dowel in there first and then putting the wood filler over the top of that.

I needed to let the wood filler dry completely before I could sand off the excess wood filler and get that back to be a flat surface. If you haven't used a wood filler much before, you want to wait until the wood filler is completely changed colour. Wood filler will actually get a fair bit lighter as it dries. It will start out quite dark, but if you wait till it is completely dry, it will sand off easily. However, if you try and sand it off too early, it will gunk up in your sandpaper and just become a whole lot more time-consuming. So, I waited for this wood filler to dry completely and then sanded the wood filler back so that it was a nice smooth surface with the timber.

The next thing that I needed to do was measure out my drawers. Because we are going to be routing out the drawer fronts, we want to get that exact apothecary feel. I measured the halfway mark on the drawers, and I wanted to create my drawers to be divided into thirds. So, I measured the halfway point first and used a piece of timber to draw my straight line across that halfway point. Then, using my clamps, I clamped that timber down so that I could use the guide to route along to ensure that I got a really nice clean, crisp line on the drawer. I just used the same pencil and the same timber to measure out the thirds on the drawer and then used my clamps again and clamped that timber down.

When it comes to using a router, you want to ensure that you check and double-check all of your measurements before you cut because once you have used the router, if you have made any mistakes, it is really difficult to fill those in and try and fix those mistakes afterward. So, checking and double-checking your measurements before using the router is essential.

If you haven't used a router before, it is also really good to have a practice on a piece of scrap timber so that you can get used to holding the router and what depth you need to have the router bit at to get the best cut into your piece. Different types of routers can also make a difference in the way that they cut, and this particular router is a handheld Ryobi battery router, which is really easy to use for a beginner.

Once I had finished routing all of my drawer fronts, I used an orbital sander to just go over the drawer fronts and smooth out any of the rough edges that had been caused from using the router. This just ensures that I have a really smooth finish before I apply my paint wash.

Before applying my paint wash, I made sure to clean all of the drawer fronts again to remove any sanding dust that may have been left behind. This is really important because if you have sanding dust on your piece before you paint it, it can cause your paint to bubble and just not go on smoothly.

Using wood filler can be a little bit tricky when you want to have a raw timber finish because the wood filler can stand out and be really obvious in the final finish. This is because wood filler doesn't absorb the stain or paint the same way that timber does. To get around this, I applied a solid paint colour over the wood filler first before applying my paint wash. This helped to ensure that the wood filler blended in better with the timber and didn't stand out as much.

For the paint wash, I mixed my paint with water to create a thinner consistency. This allowed the paint to soak into the timber more like a stain rather than sitting on top of the timber like a paint.

I applied the paint wash with a brush, working in small sections to ensure that the paint didn't dry before I could wipe off the excess with a cloth. This technique helps to highlight the natural grain of the timber while still giving it a new colour.

After applying the paint wash to the entire piece, I let it dry completely before moving on to the next step.
Next, I applied a clear topcoat to protect the finish and give it a nice sheen. I chose a water-based polyurethane because it dries quickly and is easy to work with. I applied two coats, allowing each coat to dry completely before applying the next one.

Finally, it was time to install the new hardware. I chose these little apothecary-style handles to complete the look. I measured and marked the placement for each handle, drilled the holes, and then attached the handles with screws. This was the final touch that really brought the apothecary cabinet look to life.

And there you have it! A DIY apothecary cabinet that looks high-end but was made on a budget. I hope you enjoyed this project and feel inspired to create your own.

If you want to watch the full step by step tutorial you can just click below to go to the video tutorial.
Do You Want To Hang Out With Us On A Regular Basis?
Don't miss out on your dose of DIY and furniture painting inspiration each week.
As a member of our family you will get hand delivered DIY, furniture flipping, crafting and home inspiration weekly along with tips to help you make more money as a furniture artist (if that is your cup of tea).
Sign up now. You know you want to. 😉


